K8s Operators— CIS Kubernetes Benchmarks
How can I run my workloads securely on top of Kubernetes?
In this post, we’ll be taking a look at the CIS-Benchmark, breaking the concept down to simple terms, and in the end, deploying the CIS-Operator using Helm charts and custom values.
Without further ado, let’s dive in!
Learning CIS Benchmarks at a glance can be daunting with a tremendous amount of terminology things to know about and understand. To keep it simple, I made it into two distinct parts:
- Part A: CIS-Benchmarks — Theory
- Part B: CIS-Operator Fire & Customize
Please feel free to jump into the section that has higher impact to you!
Part A: CIS Benchmarks — Theory
A.1. What Security Value does CIS-Benchmark offer?
K8s ships insecure; default values are most of the time kept unchanged, leading to open vulnerabilities for attackers to come in and take over a system and, worst, steal critical data. The idea behind CIS-Benchmarks is to identify vulnerabilities and guide DevSecOps teams in proactively focusing their efforts directly on highly critical issues, thus reducing the options to attackers.
So, What are CIS Kubernetes Benchmarks?
CIS stands for “Center for Internet Security”, a global standard that guides organizations in applying cybersecurity best practices to target Kubernetes environments.
CIS is a way to describe identified issues to end-users, with explanation on the way to remediate critical vulnerabilities and become compliant with cybersecurity standards.
A.2. Kubernetes security Projects & Challenges
Several open-source projects are available to perform such exercises; Some are listed below.
Kube-Bench
Open-source automated tests that execute “CIS Kubernetes Benchmark” tests to ensure the cluster deployments meet the security standards provided by the CIS. The pods run as a privileged container as it requires advanced capabilities.
Kube-Hunter
Another OpenSource penetration testing tool hunts for security threads in your K8s deployments; It enables CISOs to identify issues before attackers exploit the resources. (Automated PenTest tool)
Challenges
Scanning with Kube-Bench at scale for a set of K8s clusters can easily become laborious and tricky. You’ll be having to carry out several steps by logging into different nodes, setting up the toolset, scanning for vulnerabilities, and exporting/analyzing the resultant JSON/CSV reports.
Thankfully, the CIS-Operator makes life easier for DevSecOps teams; Better when coupled with Sonobuoy.
Part B: CIS-Operator Fire & Customize
B.1. Architecture
The CIS-Benchmark operator leverages Kube-Bench from AquaSecurity, to check Kubernetes for CIS Benchmark compliance. For cluster-wide reports, the application utilizes Sonobuoy. RBAC rules are handy for multi-tenancy purposes.

Sonobuoy is so valuable component as it eases reports aggregation/storage. It’s not included in our today’s blogpost.
The above-mentioned operator was introduced by Rancher in 2020 with several capabilities:
- Schedule security scans with permissive/hardened profiles,
- Raise alerts and generates reports on the scans,
- Flexibility in managing custom global rules,
- Support for SAML/OpenLDAP integration and RBAC rules for basic access control (View and Admin modes only),
- One of the main advantages is its integration with OPA OpenPolicyAgent Gatekeeper, which we discussed in a previous blog post.
- A feature-rich dashboard that provides instant and deep insights into the identified vulnerabilities.
B.2. Deploy the CIS-Benchmark Operator
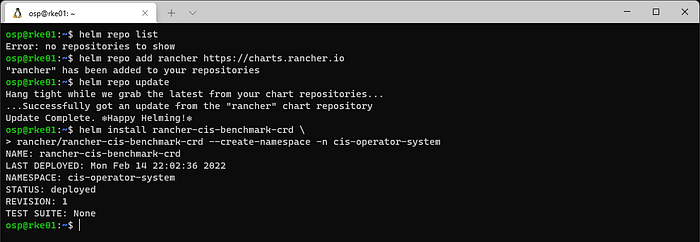
The CIS-Operator is easily deployed through Helm charts. First, we should install the CRDs used by the CIS Operator:
helm repo add rancher https://charts.rancher.io
helm repo updatehelm upgrade --install rancher-cis-benchmark-crd \
    rancher/rancher-cis-benchmark-crd \
    --create-namespace -n cis-operator-system
Once done, we can proceed with the Operator installation through the official Helm charts, hence enabling security scans and reports’ generation:
helm upgrade --install rancher-cis-benchmark \
  rancher/rancher-cis-benchmark \
  -n cis-operator-system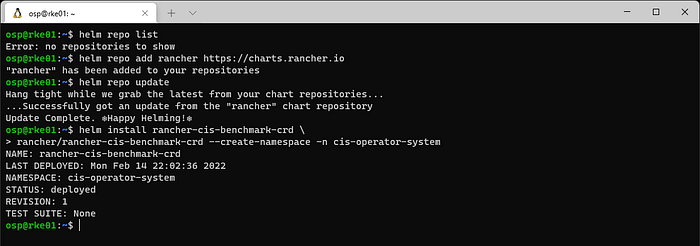
Behind the scenes, the last 2 commands create a bench of Custom Resource Definitions, deployments/daemonSets, roles, and more in the cis-operator-system namespace.
We can check them out using the below cli:
kubectl get crd | grep cis.cattle.io
kubectl get all -n cis-operator-system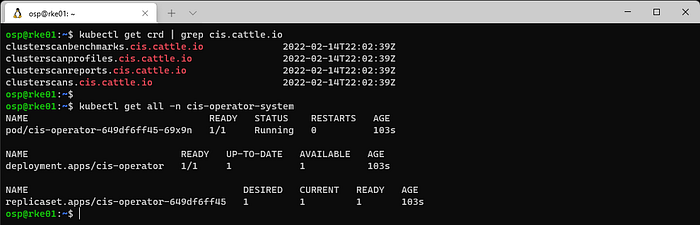
Once the resources are up & running, we can analyze the OOTB provided scan profiles:
kubectl get clusterscanprofiles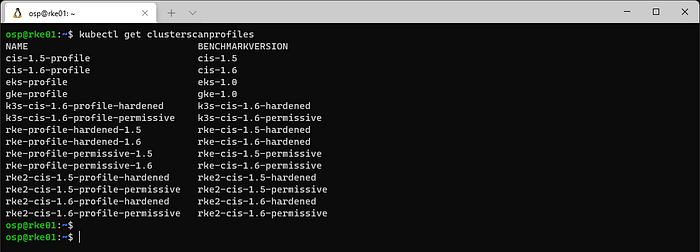
kubectl get clusterscanbenchmarks
B.3. Scan & Customize
A ClusterScan manifest is required to trigger a full scan of a target cluster and its underlying resources. Open a text editor and paste/save the below code snippets to “cluster-scan.yaml”.
apiVersion: cis.cattle.io/v1
kind: ClusterScan
metadata:
  name: generic-permissive-cluster-scan
spec:
  scheduledScanConfig:
    cronSchedule: "1 0 */14 * *"
When omitting to mention the CIS-Profile, CIS-Operator automatically identifies the right profile based on the detected kubernetes version and cluster type (EKS, GKE, RKE, etc.)
kubectl apply -f cluster-scan.yaml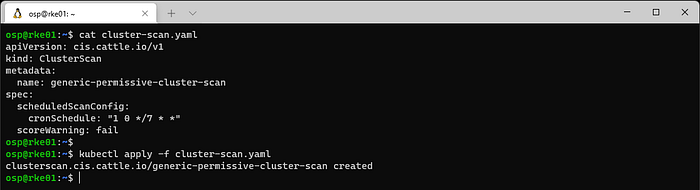
After a minute or so, our scan should run to completion. Let’s examine the scan and its resultant report:
kubectl get clusterscans
kubectl get clusterscanreports
Each scan results in a JSON formatted report, viewable from the CLI. The reports are to log what tests it has run, whether they have passed or failed, and recommendations on remediating them.
The report is an output generated by ClusterScan and stored as a manifest that uses the CRD ClusterScanReports.cis.cattle.io
Conclusion
The discussed benchmarks could become useless if DevSecOps teams do not react/remediate the issues and vulnerabilities identified in the scans. The reports should be thoroughly analyzed, and high-risk issues should be tackled instantaneously.
No one will be able to withstand high-security threats and impact. Better be proactive!

